

In Part 1 of this who-knows-how-many-parts-there-will-be Retro-Futuristic-Steampunk Technologies mini-series, we focused on one of my favorite display technologies in the form of Nixie tubes. We also featured a photograph showing the main control room of an abandoned power plant in Hungary that—much like your humble narrator—was simply oozing with style.
In that photograph, you may have spotted another of my favorite display technologies—vintage analog meters—which I typically acquire at Hamfests and electronic flea markets. I really like the look and feel of these little beauties so long as they are of a certain age, thereby bestowing an air of gravitas upon the occasion of their use.
One of my ongoing hobby projects is what I call my Vetinari Clock, which is named after one of the characters from Terry Pratchett’s Discworld series. Lord Havelock Vetinari, who is the Lord Patrician in charge of the city-state of Ankh-Morpork, has a strange clock in his waiting-room. While it does keep completely accurate time overall, it sometimes ticks and tocks out of sync (for example, “tick, tock … ticktocktick, tock …”) and it occasionally misses a ‘tick’ or a ‘tock’ altogether. As a result, by the time Lord Vetinari’s visitors are finally granted an audience, their nerves are already frayed and frazzled.
In the case of my own interpretation of this device, I decided to employ four analog meters: a large one for the hours, two medium ones for the minutes and seconds, and a little one to swing back and forth each second like a miniature metronome. You wouldn’t believe how much time I can spend (some may feel the word “waste” is more appropriate) deliberating over things like the layout of a front panel. For example, consider the current state of play with respect to my cunning chronometer.
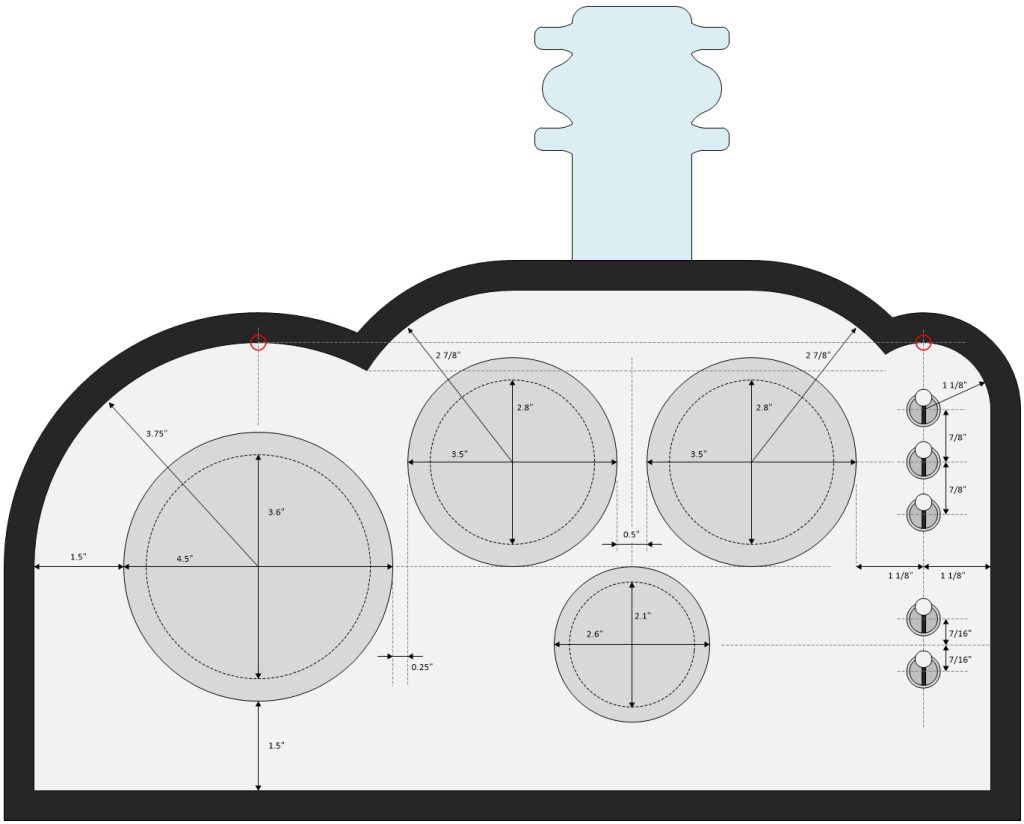
Front panel layout for the Vetinari Clock (Image source: Max Maxfield)
I’m sad to say that I’ve never received any formal training in design, but I do have an innate belief that people notice little things, albeit subconsciously. For example, observe that the bottoms of the two medium-size meters and the top of the small meter are lined up with the centerline of the large meter. Also, that the upper group of three toggle switches is aligned with the centerline of the medium-size meters, while the lower group of two switches is centered on the small meter.
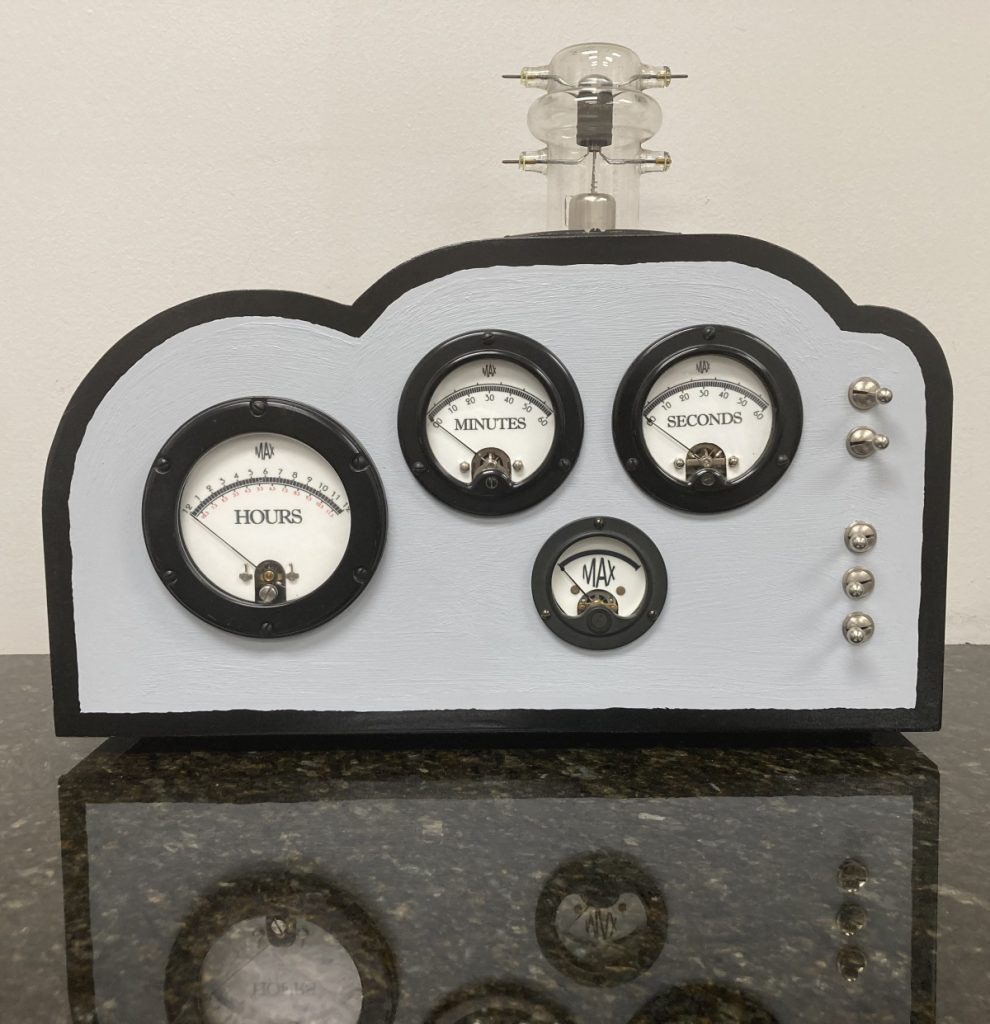
Prototype front panel (MDF with a slap of paint) for the Vetinari clock
(Image source: Max Maxfield)
Of course, it’s necessary to replace the front panels of these meters so as to present the desired information. There’s also the fact that many (perhaps the majority) of antique meters come equipped with shunt or series resistors, which may be mounted externally or internally. Generally speaking, it’s a good idea to remove all of these extraneous resistors and then add what you need back in, but be careful! You can’t simply use a multimeter to check the internal resistance of the meter, for example, because attempting to do so may destroy the coil (myriad nuggets of knowledge like this are required to successfully work with these devices). Also, these meters are typically presented as sealed units; opening them up can allow unwanted particles like dust to enter.
On the bright side, one of the great things about all of this is that it’s easy to control this sort of meter using a pulse-width modulated (PWM) output from a microcontroller unit (MCU), like an Arduino, for example.
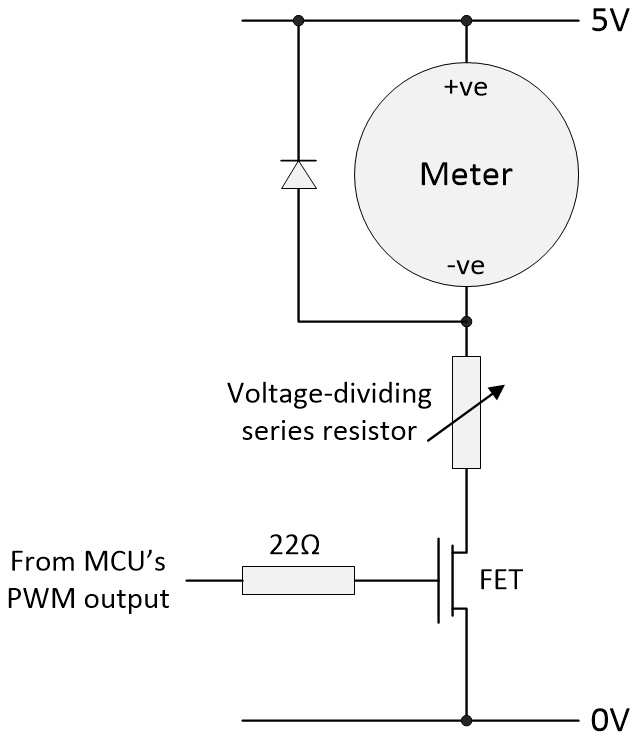
Using a PWM output from an MCU to control an analog meter (the diode is included to protect against back-EMF)
(Image source: Max Maxfield)
I’ve said it before, and I’ll say it again: “It’s not what you know; it’s who you know.” Fortunately for me, I was introduced to Jason Dueck from Instrument Meter Specialties. Jason and his colleagues are experts in anything and everything to do with antique and modern meters, including repairing and restoring the little scamps.
It turns out that there’s a small but significant market with respect to refurbishing old analog meters. Suppose you have a 30-year-old airplane and one of its meters goes wonky, for example. You can’t simply run down to your local electronics store and pick up a modern replacement, because the plane was certified with the original type of meter. At this point, you essentially have three choices: (a) have the plane recertified using a different meter, which will be horrendously expensive and time-consuming, (b) hunt around in the desperate hope of finding a 100% identical replacement, or (c) send the wonky meter to Instrument Meter Specialties and have it restored to its original pristine condition.
Exactly the same sort of thing applies to nuclear submarines and suchlike, which were commissioned with a specific set of components, including analog meters. Trust me; you really don’t want to be the one to tell those who don the undergarments of authority and stride the corridors of power that they are going to have to spend outrageous amounts of money to recommission their nuclear power station simply to use a modern meter.
By some strange quirk of fate, something like this actually happened a few years ago. Jason told me about an incident with which he was involved regarding a nuclear power station. It seems that, when the station was originally commissioned about 40 years previously, its owners had thoughtfully purchased sufficient spare parts of everything, including any meters, to last the lifetime of the facility. When the performance of some of the meters eventually started to degrade, the engineers retrieved their replacements from storage and… ran into a problem. The annotations on the front panels of the meters in question spanned the range from 0% to 150%. The instruction manual said that the meters had to be accurate to 1% but failed to make clear whether this was 1% of 150% (full-swing) or 1% of 100% (two-thirds of full-swing). The meters met the former, lesser specification, but not the latter.
Not wishing to take any chances, they shipped everything to Jason who ensured the meters satisfied the strictest interpretation of the specification. This included making custom faceplates for each meter, where slight variations in the spacing of the annotations were introduced to perfectly match small nonlinearities in the motions of the meters. (Who knew meters could be so interesting?)
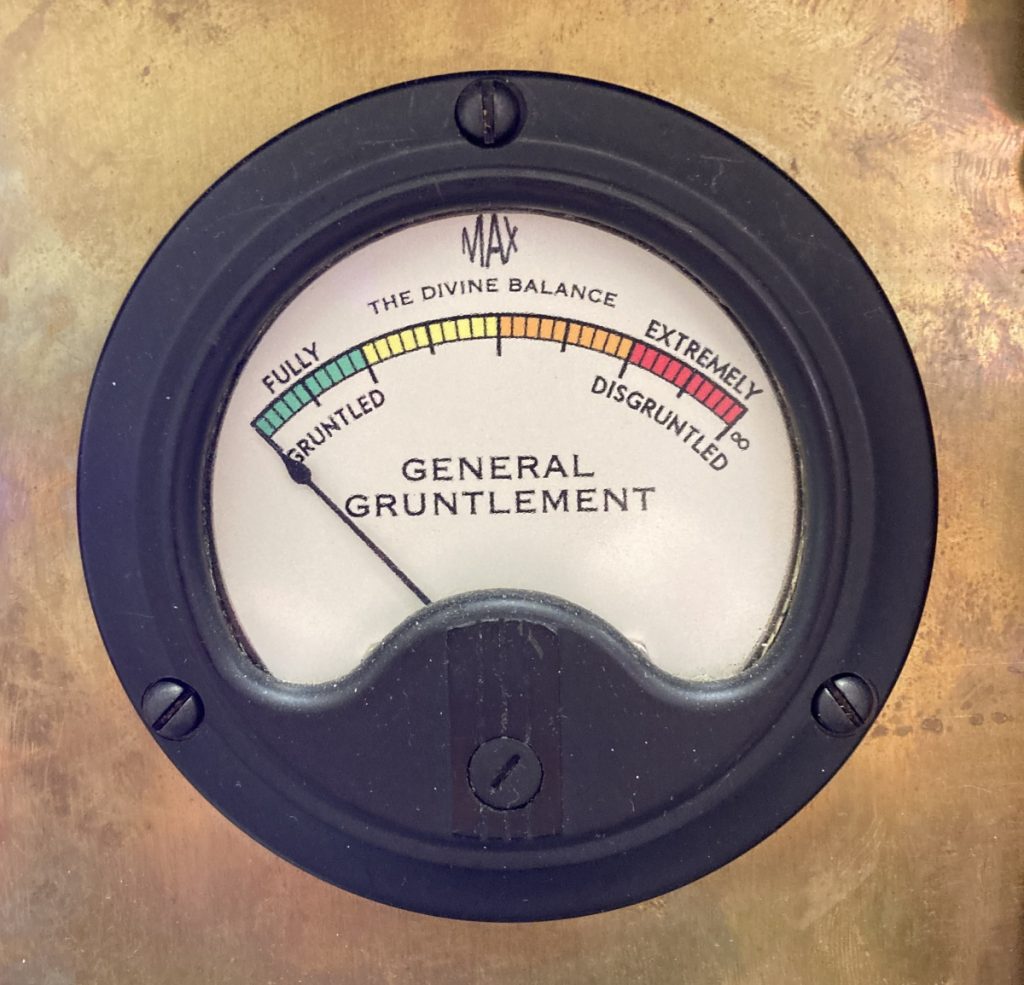
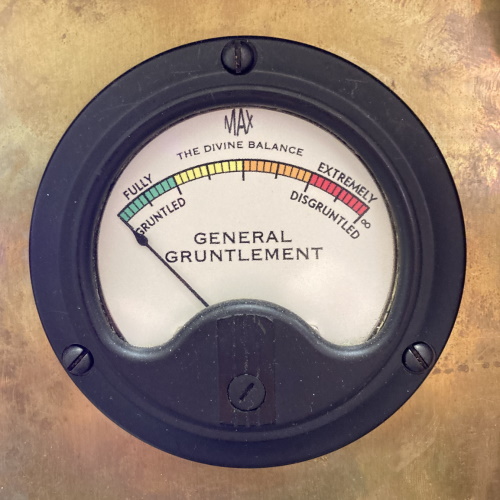
One of the refurbished meters from my Prognostication Engine, including an updated faceplate
(Image source: Max Maxfield)
To cut a long story short (which really isn’t my forte), I shipped the meters for my Vetinari Clock—and also the meters for my Phantasmagorical and Pedagogical Prognostication Engine—over to Jason, who opened them up, cleaned them out, and replaced the faceplates with my custom creations. Jason also removed any existing series and shunt resistors and replaced them with whatever each meter required to ensure a full swing when supplied with 4.5V.
Why 4.5 V? Well, I’m using a 5V supply, but that might vary by +/- 0.1V, let’s say. Also, if you consider the circuit shown earlier, there will be a small voltage drop associated with the field-effect transistor (FET). So, having 0.5V to play with allows me to include a small voltage-dividing trimmer potentiometer (trimpot) in series with the meter. I start off with this trimpot at its maximum value, drive the meter with a 100% PWM value from my microcontroller, and then gradually lower the trimpot value until the meter achieves its full-scale deflection.
What say you? Have you used any vintage analog meters in your own hobby projects? If so, I’d love to hear about them and see pictures. If not, then has anything you’ve seen here tempted you to do so in the future? As always, I welcome your comments, questions, and suggestions.


