


The funny thing about knowing something yourself is that you tend to assume everyone else knows it also. This is especially true on a site like EEJournal that attracts electronic engineers and embedded systems developers from all walks of life. But the funny thing is — when you actually get to sit down and chat with people — you begin to realize how little they typically know outside their own area of expertise.
The same is true the other way round of course. In fact, although I don’t like to boast, I think it’s fair to say that people are often amazed to discover how little I know about almost any topic they care to mention. Not that this stops me from talking about those subjects, you understand; as I’ve said on many an occasion, much like my dear old mother, the real trick is to get us to stop talking.
One of the things I’m often asked is the best way to learn how to write programs (software) and how to use microcontrollers (hardware). Many times, this is driven by a desire to accomplish some particular task. A few years ago, for example, one of my friends who was constructing a humongous model railway diorama in his upstairs recreation room (a “man cave” if ever I saw one) had just such a task in mind. He wanted to control the diorama such that when he turned out the main light in the room, streetlights would come on street-by-street, and room lights in the buildings would randomly turn on and off.
Well, as I always say, “Show me a flashing LED and I’ll show you a man drooling.” Suffice it to say that my friend’s diorama is now a festival of lights — you almost need to be wearing sunglasses to enter the room.
The funny thing is that I know people who write mindbogglingly complex application software for use on workstations and servers, but they don’t feel comfortable twiddling the input and output pins on a microcontroller to sense and control the real world. I also know people who are gurus with regard to electronic hardware design, but who never got around to dipping their toes in the programming waters.
So, what do I advise? Well, that’s a bit tricky because it all depends on what people are trying to do. There are, of course, all sorts of microcontroller development systems out there. For myself, I’m really comfortable with Arduino boards and their clones. I also like the relative simplicity of the Arduino’s integrated development environment (IDE) with which you capture your programs, compile them, and upload them into the development board.
When it comes to programming languages, I’ve dabbled in all sorts over the years, including various assembly languages, BASIC, FORTRAN, Pascal, C, and Python. I have friends who are passionate proponents of Python, and I do like it a lot myself, but when it comes to working with microcontrollers, I pretty much stick to the C programming language, along with whatever calls to functions I need to use in any C++ libraries I happen to be working with at the time.
With regard to specific development boards, this varies depending on what I’m doing at the time — all I ask is that they are Arduino-compatible and that they can be programmed using the Arduino IDE. For example, some time ago I created a 12×12 array of ping pong balls, each containing a tricolor LED in the form of a WS2812B (a.k.a. NeoPixel). In fact, I recently uploaded this video showing my array running Conway’s Game of Life (GOL).
In this case, I opted for a low-cost (approximately $5) Seeeduino XIAO from Seeed Studio, which — although only the size of a regular postage stamp — boasts a 32-bit Arm Cortex-M0+ processor running at 48 MHz with 256 KB of flash memory and 32 KB of SRAM (see also Say Hello to the Seeeduino XIAO).
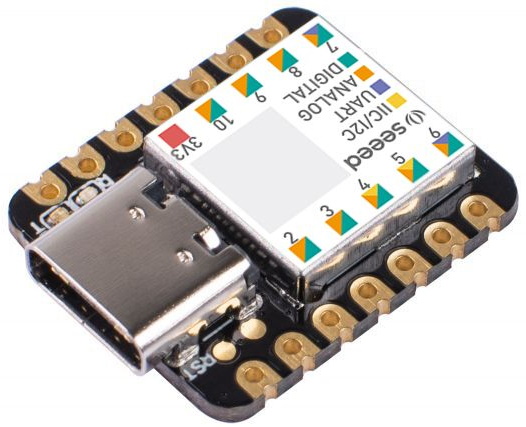
The Seeeduino XIAO is the size of a small postage stamp
(Image source: Seeed Studio)
By comparison, another of my projects is my legendary Prognostication Engine (don’t ask). As we see in this video, this bodacious beauty boasts a cornucopia of antique switches and knobs and analog meters. There are 116 tricolor LEDs associated with the knobs, switches, and pushbuttons in the lower cabinet; 64 tricolor LEDs in the furnace in the upper cabinet; and 140 tricolor LEDs associated with the large vacuum tubes mounted on top of the engine.
I started off using multiple Arduino Mega boards, but getting them all to talk to each other was a pain in the nether regions, and that’s not a good place for a pain to be. More recently, I’ve started to use a ShieldBuddy TC375 from Hitex (see also Gasp in Awe at the ShieldBuddy TC375).
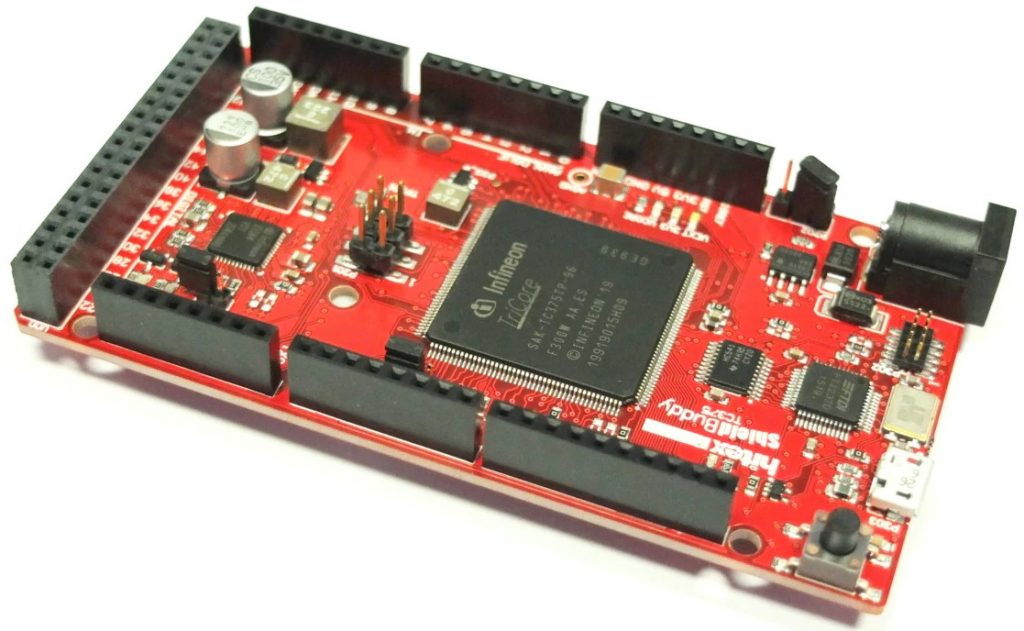
The ShieldBuddy TC375 (Image source: Hitex)
Although the ShieldBuddy has the same form factor as the Arduino Mega, it’s mindbogglingly more powerful, starting with the fact that it’s got three 32-bit processor cores each running at 300 MHz, each with its own floating-point unit (FPU), and each with more memory than you can throw a stick at! Although the cores run independently, they can communicate and coordinate between themselves using techniques like shared memory and software interrupts.
One of the great things about using the Arduino is that you have access to a vast number of plug-in boards called shields that do all sorts of useful things. These boards also come with example software to get you up and running quickly and easily. As one example, recently I wanted to start playing with MEMS (microelectromechanical systems) sensors, so I opted for a 9-DOF (nine degrees of freedom) Fusion Breakout Board (BOB) from Adafruit.
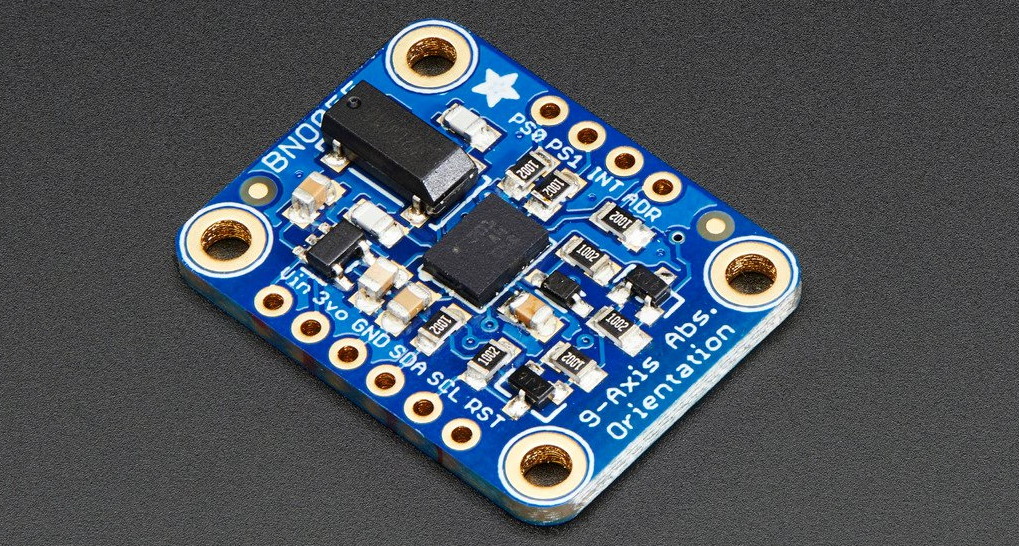
9-DOF Fusion breakout board (Image source: Adafruit)
This board boasts a BNO055 MEMS sensor from Bosch. In turn, this sensor features a 3-axis accelerometer, a 3-axis gyroscope, and a 3-axis magnetometer. Also, it has a 32-bit Arm Cortex M0+ processor that performs sensor fusion and returns values in a form you can understand without your brains leaking out of your ears. As we see in this video, I attached one of these sensors to my 12×12 pong pong ball array. The idea was to use the sensor to measure the tilt of the array and to use those measurements to “roll” a “ball” around the array.
Using the example code supplied by Adafruit, it literally took me only a couple of minutes to start accessing readings from the sensor. No more than 15 minutes later, I was using the sensor to control my array.
So, supposing you are an absolute beginner, and assuming that you are tempted to try the Arduino, which one should you choose? If I’m teaching someone new, I usually advise starting with an Arduino Uno or an Arduino Nano because both of these are easy to wrap your brain around.
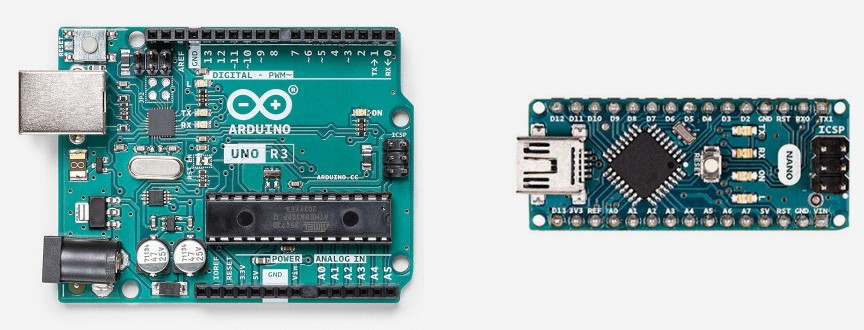
Both boards use an 8-bit ATmega328 processor (albeit in different packages) running at 16 MHz and offering 32 KB of Flash memory and 2 KB of RAM. On the one hand, this isn’t much in terms of memory or performance. On the other hand, it’s amazing what you can do with these little scamps, and working within limitations is good for you when you are starting out.
OK, what’s your next step? Well, there are tremendous amounts of free resources available on the internet. Also, there are some awesome Arduino Starter Kits on Amazon. Having said this, these kits typically feature the use of breadboards, which can be both a blessing and a curse. Take a look at the following image, which bears an uncanny resemblance to a lot of my own prototypes.
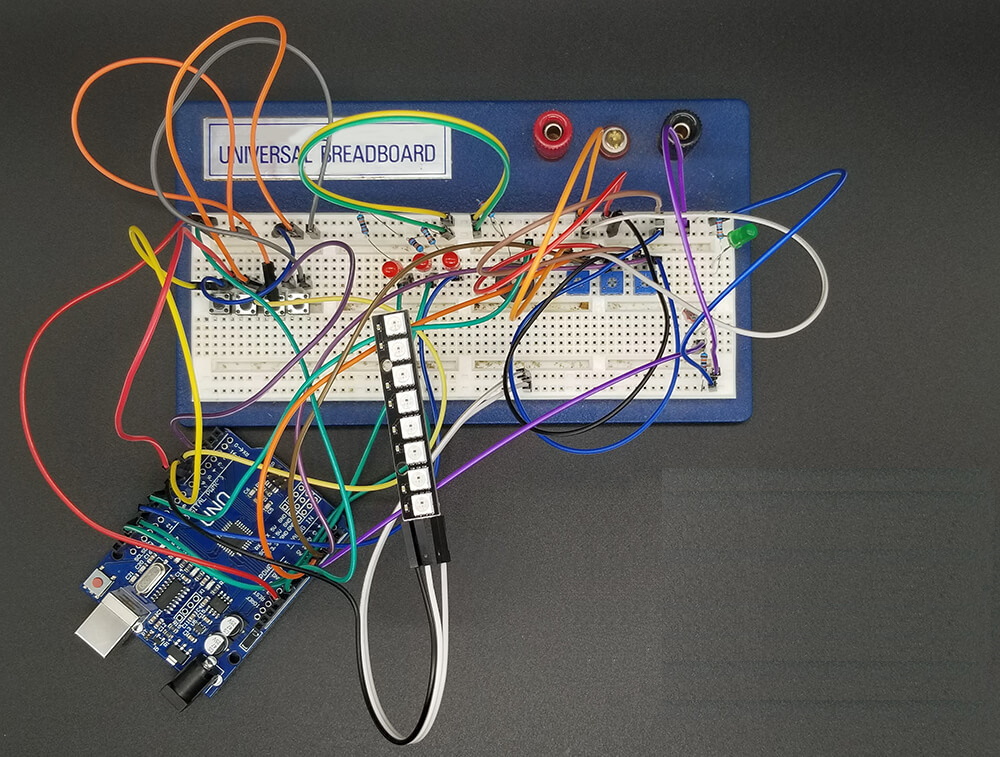
A typical Arduino Uno prototyping scenario (Image source: Dr Duino)
Here we see all of the elements that I commonly employ in my own projects — some momentary pushbutton switches, some potentiometers, a few traditional LEDs with associated current-limiting resistors, a “stick” of tricolor NeoPixel LEDs, and — of course — a bunch of flying leads. It’s all fun and games until one’s spouse requests that you “clear your electronics rubbish off the dining room table” (just to pick a random example out of thin air) and one or more of your flying leads become detached in the process and you can’t remember which one goes where.
But turn that frown upside down into a smile because my chum Guido Bonelli decided to do something to address this. Guido is an interesting case in that — way back in the mists of time — he was using sophisticated microcontroller development platforms and Eclipse-based toolchains at work, but he wanted something cheaper and simpler to use with his hobby projects at home, which is how he came to start playing with the Arduino.
More recently, Guido created a kit called the Dr. Duino Pioneer shield, which comes with an Arduino Uno. The Pioneer, which plugs into the top of the Uno, provides the user with regular LEDs, a stick of eight NeoPixels, pushbutton switches, potentiometers, a light-dependent resistor (LDR), a piezo buzzer, and headers for you to connect I2C-based sensors. Also, not shown in this image is the fact that the Pioneer comes with an ultrasonic distance measuring sensor and associated cable to connect it to the shield.
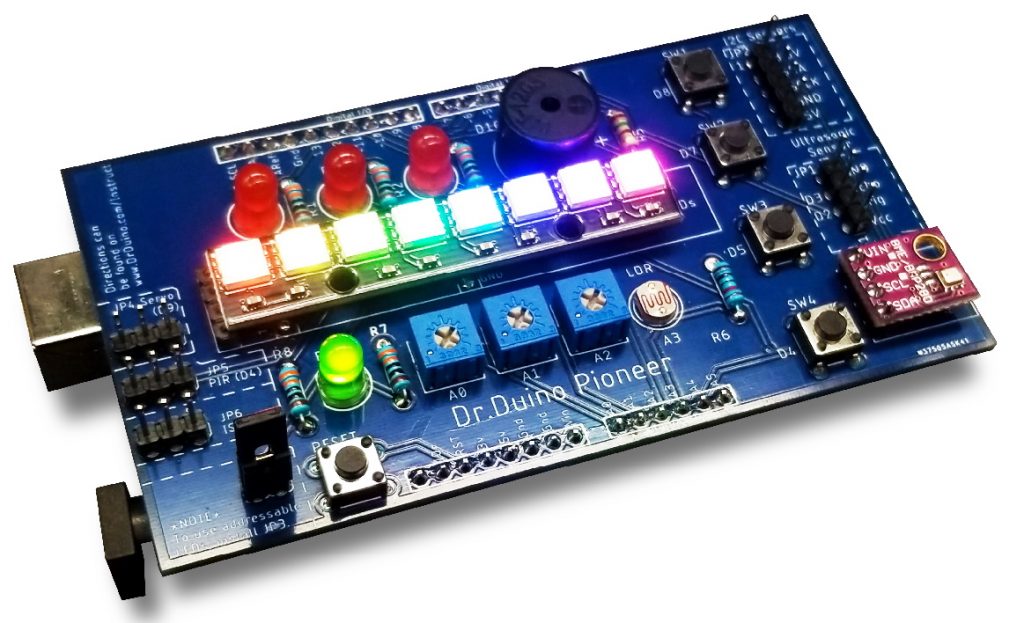
Dr. Duino Pioneer (Image source: Dr Duino)
The next step up — and the one I have on my desk — is the Dr. Duino Explorer kit. This has all of the features of the Pioneer augmented with a cornucopia of other goodies, including an organic LED (OLED) display, a meaty voltage regulator to power your projects, a small breadboard, and a small prototyping area.

Dr. Duino Explorer (Image source: Dr Duino)
As you may recall, the Pioneer came with an Arduino Uno. Well, the Explorer comes with an Arduino Nano, which you can see plugged into the middle of the lower edge in the photo above. If you wish, however, you can remove the Nano, and then plug the Explorer as a shield into an Uno (you can see the Uno headers surrounding the small breadboard).
There’s also an Expansion Pack that can be used with both the Pioneer and the Explorer. This includes a sound effects board, a passive infrared (PIR) sensor, a 6-DOF (six degrees of freedom) sensor with a 3-axis accelerometer and 3-axis magnetometer, an atmospheric sensor (temperature, humidity, barometric pressure), and so on.
VERY IMPORTANT! I just remembered that I have to tell you that both the Pioneer and Explorer come as kits of parts that you have to assemble yourself. On the bright side, if you are planning on really getting into microcontrollers for DIY projects, you will be doing a lot of this stuff, and this is as good a place to start as anywhere.
Happily, when you purchase a Dr. Duino Pioneer or Explorer, you also get access to the Dr. Duino Labs. This is where you will work with a Wizard that walks you through the build process (including recommending tools and teaching you how to solder) in one of the best step-by-step guides I’ve ever seen, and this is not something I say lightly.
Once you’ve assembled your kit, the system then walks you through the process of downloading and installing the Arduino IDE and running some simple programs (a.k.a. “sketches” in the Arduino world). All of this leads up to some clever little projects that are provided, such as a Larson Scanner, which is the sort of effect seen in KITT from Knight Rider or the Cylons from Battlestar Galactica. Following the provided instructions, you can implement your own version of these iconic cycling lights on your Pioneer or Explorer.
Where Guido has really gone the “extra mile” is to partner with a company called the Programming Electronics Academy (PEA). The PEA will give you access to a bunch of free videos that will teach you how to program your Arduino.
I’m sorry — what was the question again? I’m afraid I got a little carried away. I could have carried on typing for hours, but I just realized that it’s almost time for me to close down my office and head home to my wife (Gina the Gorgeous) because I certainly don’t want to be late for supper lest the radiance of her smile ceases to fall upon me. All I want to say in summary is that, for anyone who wants to learn how to program and to use microcontrollers in their hobby projects, there are many options, but Arduinos provide a great place to start. Also, if you are commencing at ground zero, then the Dr. Duino Pioneer and Explorer kits provide a really good way for you to get your foot in the door, as it were. As always, I welcome your comments, questions, and suggestions.


Perhaps in another article you could suggest the alternative of using/learning Python (or the hardware aware variant CircuitPython) together with boards from Adafruit / Sparkfun / Other. One of the great things about this approach is that you don’t even need an IDE, just write a few lines of code on any text editor, copy them to the mounted drive via USB and you’re done.
Programming means checking and this is often done by starting with “Hello world!”. On a microcontroller this is expensive in terms of space and time and impossible inside an interrupt. The little Trice (https://github.com/rokath/trice) can help with that incredibly.
I agree the Arduino environment is great for personal projects as well as learning. Much cheaper than development boards in the past and easier to learn. The Arduino starter kits on Amazon and Ebay are an inexpensive way to get lots of basic stuff. I started with 8048 assembly years ago, transitioned to 8051, but gave up writing in assembly due to not really wanting to write math routines for floating point numbers (I already did it for 64 bit add and multiply). C became my portable assembly language after that. Played with the SDCC for 8051 and the AVR series. But the uploading process was more painful than just using the Arduino environment. That said, C is good, but less optimal than assembly. You depend on the C compiler writers to use the available op codes efficiently, but hand coded assembly can definitely be more optimized, shorter, and faster. Higher level languages like Python are easy to use, but you need more memory and faster processors. But ultimately, everything must be reduced to machine code to execute on a processor.